Independent Body Restoration Shop
Isuzu Cylinder Heads Disassembly
Isuzu Engine Troque Specifications
Service Shop Manual B2200 1993
Web Auto Repair DatabaseFollow Auto Tech Internship and Sister Companies on Facebook and Twitter
 Facebook us @
Auto Tech Internship
 Twitter us @
Auto Tech Internship
To view the example database:
Web Auto Repair Database
We are looking for an affiliation and/or corporate sponsorship with your company, or both, and if so, we would add a link with your logo and company information on the bottom of each web page on both our websites to show your support for this educational plan.
If you want to help move Tech Craftsman Career Building Trade School move forward please donate:
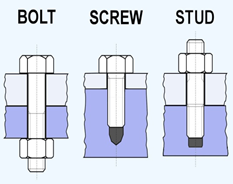
 Kansas City, Missouri World Headquarters Web Auto Repair Database (WARD)Education Division: Advanced Technology Career University (ATCU) In order to offer Tech Craftsman Career Building Trade School's interns/apprentices more than just going to work, becasue that's what TCCBTS is all about, 24 months, working 5 days a week and 8 hours each one of those 5 day weeks, yes, its a school but learning as if it was a job. TCCBTS's goal is to reward our first-year interns/apprentices by expending their experiences so they can show off their skill while still going to school. How? Easy we're going to create and develop several, Independent Commercial Businesses for the interns/apprentices to work before class or after class or both, and allowed to work on weekends and paid $15.00 dollars an hour. Now the interns/apprentices are not only earning real money, but learning on the job skill social by interacting with real customers asking for their experience and help. INDEPENDENT COMMERCIAL BUSINESS DIVISION Business Intellectural Concept Created by James E. Grow Library of Congress Copy(c) 2015-TXu-1-954607 Certificate of Registration To return back to Auto Tech Internship/Apprenticeship website click below: Auto Tech Internship/Apprenticeship Note: After engine has been removed from vehicle and engine has been disassembled Fly wheel screws, known by most inexperienced as bolts which are actually called screws, add a nut then it a bolt The Vehicle discussed in this project is a 2002 Isuzu Trooper LS 3.5L V6 DOHC 5 Door-4 Wheel Drive Step 1:After relieving the fuel system pressure. Disconnect the negative battery cable. Drain the engine coolant. Drain the engine oil. The engine will have (The fuel pressure control valve mounted on the fuel rail maintains a pressure differential across the injectors under all operation conditions. It is accomplished by
controlling the amount of fuel that is recirculated back to the fuel tank based on engine demand. Relieve the fuel pressure by connecting a fuel pressure gauge to
the fuel pressure connection on the fuel rail.) Fuel pressure is (41-46 psi engine running. In order to reduce the risk of fire and personal injury, wrap a shop towel
around the fuel pressure connection. The towel will absorb any fuel leakage that occurs during the connection of the fuel pressure gauge; dispose the shop towel in
approved container when the task is finished. Disconnect the fuel pump relay and crank the engine to relieve the fuel pressure. Step 2: Make alignment marks on engine hood and hinges before removal in order to return the hood to original position exactly, remove engine hood,
replace the hood screws back in their original location on the hood hinge, (place fender cover on roof of vehicle, place hood on the top fender cover). Step 4: Remove the intake manifold cover, power brake booster hose and the quick-connect fitting cover, and then disconnect the fuel feed hose. always
plug any fuel line, thread a screw into all disconnected fuel line and/or hoses and plug them so dirt will not enter the lines. Step 5: Disconnect the evaporative emission canister hose. Remove the intake manifold bracket. Step 6: Remove the engine wire harness connectors and the wire harness clamps from the cylinder head and intake manifold. Remove the four fuel injector Step 7: Disconnect the engine coolant temperature sensor connector, throttle body connector, and the Air/Fuel (A/F) sensor connector. These connectors Step 8: Disconnect the manifold absolute pressure connector, rocker arm oil control solenoid connector, rocker arm oil pressure switch connector, and the As each step is explained there will photo's included to help you understand each step, the photos will be include to help you follow along better. This Trooper 3.5L blew a #2 rod bearing, the bearing just, causing the crankshaft to push the rod up the cylinder wall farther than designed for, this caused the The engine had to be pulled and cleaned. there was damage to the crankshaft which had to be taken to a machine shop to be repaired, the cylinder wall were The Isuzu Trooper met two of the criteria's requirements So it was worth doing the rebuild. Follow these steps to remove engine from vehicle: REMOVAL: Preparation 1. Radiator hose 2. Fan Shroud 3. Cooling Fan Assembly 4. Radiator Assembly 7. P/S Pump Drive Belts 8. P/S Pump Assembly 9. Engine Ground Cable 10. A/C Generator Harness 11. A/C Compressor Assembly 12. Vacuum Hose: Vacuum Pump 13. Starter Harness 14. Engine Harness. 15. Accelerator Cable 16. Fuel Hose 17. Engine Ground Cable 18. Vacuum Hose: Vacuum Tank 19. Remove glow plug harness 20. Transmission Assembly 21. Engine Mounting
22. Engine Assembly |